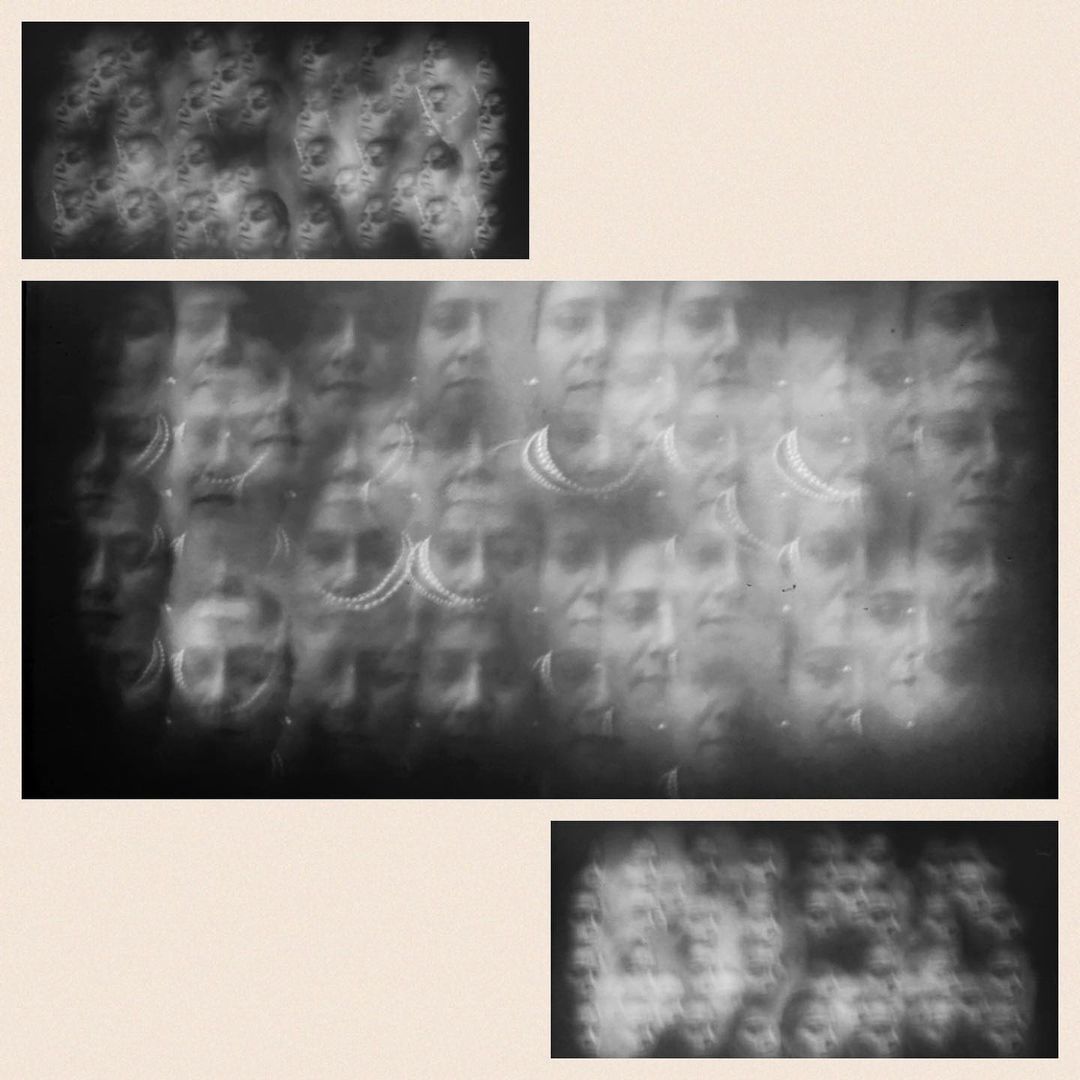
Some lenses are made with low-dispersion glass, aspherical elements, finely-milled metal. And other “lenses” are made of flour, water and salt. This article is about the strangest camera that I have ever used – the Cracker Camera.
The Cámara Galletita, or Cracker Cam, is a homemade pinhole camera where the image-forming element is a cracker – yes, the flat, dry baked food, also called ‘biscuit’ in many English-speaking countries. I made it as part of the #CamaraGalletitaChallenge on Instagram – a tribute to Italian artist Paolo Gioli, who made such a camera in the 1980s.
If you’re not familiar with pinhole cameras, here’s a very brief introduction. A pinhole camera forms images not with a lens, but with a tiny hole. It can be fashioned from pretty much any light-tight container. Rays of light enter through the pinhole and form an inverted image inside the camera. That image can then be recorded on light-sensitive film, paper or even a digital sensor.
Crackers have multiple holes, so the Cracker Cam is typically a multi-pinhole camera. Each hole projects a separate image. Depending on the spacing of the holes, the distance from the cracker to the film plane and various other factors, the images may or may not overlap.

Origin of the Cámara Galletita Challenge
I got into pinhole photography two years ago, and since then I’ve made a variety of pinhole cameras from household waste such as cardboard boxes, cake tins and plastic containers for 35mm film.
Most photographers use pinholes created specifically for cameras. For example, I usually cut a piece of aluminum from a soda-can and pierce it with a needle. ‘Good’ pinholes – small, round holes made on a thin substrate – make sharper pictures. Some people even buy precision pinholes drilled with lasers.
Paolo Gioli (1942–2022), an Italian artist and experimental filmmaker, was fascinated by ‘naturally occurring’ pinholes. Gioli made cameras from a variety of objects including buttons, needle-eyes, pepper-shakers and even ant-holes. In the early 1980s, he made the Camera Crackerstenopeica (‘stenopeica’ being the Italian word for pinhole).


[Image sources: Pinhole diagram from Wikimedia Commons, public domain. Still from Laboratorio Gioli (2013), short film by Bruno Di Marino. Pinhole Photography (2008), book by Eric Renner.]
I came to know of Gioli and his work only recently, via Instagram and the Cámara Galletita Challenge. The idea for this challenge originated in 2021, at photography workshops conducted by Sol Mendoza and Daniel Tubio in Buenos Aires, Argentina.
At one of their workshops, Sol and Daniel talked about Paolo Gioli’s experimental creations. In the following class, one of their students – Ana Lourdes Hernández Flores, a multi disciplinary artist from Mexico – presented her own cracker camera and photos inspired by Gioli’s work. Thus, as Sol recounted to me, ‘between experiments and jokes, the idea of the idea of the challenge took form.’
Ana posted her images with the #CamaraGalletitaChallenge hashtag last July. Sol and Daniel planned to publicize the challenge more widely this year, and encourage more people to join in. Unfortunately, Gioli passed away on January 28, so the challenge became a tribute in his memory.
Ana and Daniel’s images
Cámara Galletita is not an individual project but a community effort, so before talking about my own camera, I’d like to show Ana and Daniel’s images which came before (many thanks to them, for letting me share!).
Ana’s camera used Honey Graham crackers with 44 pinholes. The self-portraits were exposed for 45–60 secs (outdoors), and the doll for 93 secs (indoors). The third photo shows her camera made from a box, with a paper negative inside.
Paper negatives are popular with a lot of pinhole photographers, myself included. But a word of explanation may be useful for those who are not familiar with the idea. Enlarging paper, being light-sensitive, can be used like film. It is slow (typically around ISO 3–10), but if you’re using a pinhole camera, speed is probably not a priority anyway. The resulting image is a ‘paper negative’ – light areas appear dark, and vice versa. The paper negative can be contact-printed to get a positive print, or scanned and inverted with software.


Daniel’s image is titled ‘Mate con Bizcochito’ (mate is a tea-like beverage, very popular in Argentina; bizcochito is a salty cracker, frequently eaten with mate, which Daniel used for the pinholes). He made his camera from a cardboard box that came with a 100-feet bulk roll of Ilford HP5 film. The photo was a 15-second exposure in natural light from his studio window (the third photo shows the setup), also using a paper negative.

Making my Cracker Cam
My own Cracker Cam was made from a cardboard box that came in the post. The box is bigger than the 10×10cm paper I planned to use. I generally use smaller containers as they are easier to make lightproof and carry around, but in this case I just used the first box that I could find. In fact it’s a pretty slapdash build in general, because it’s not a camera that I plan to use regularly. I made it mainly for this challenge, and I will recycle it soon.
I painted the inside black with watercolor and a thick brush. On one side, I cut a rectangle for the pinhole. On the opposite side, I pasted a strip of paper as a guideline. When I ‘load’ paper in the darkroom, the strip acts as a reference, helping me align the paper so that it’s roughly centered. I’ve made other pinhole cameras with a paper holder, which is more convenient for repeated use. But with the Cracker Cam, I simply tape the paper to the inner wall.

The ‘focal length’ of my camera (distance from pinhole to paper) is about 8 cm. The box I used is a bit frayed and not very lightproof. So after loading, I wrap it in a red plastic bag, which seems to work well enough (photo paper can’t ‘see’ red light, so red is almost as good as black).
I generally make a proper cardboard shutter, but I didn’t make one for the Cracker Cam. Instead, I manually cover the pinholes with the Nikon lens cap shown in the photo. (Anything can serve as a shutter as long as it blocks light, but I thought it would be amusing to use an actual lens cap.) I remove the cap to make an exposure, and cover it again to end it.
Finally, I had to choose a cracker. We had three varieties at home. The small square cracker (McVitie’s 5-Grain) has rather large holes, which would make for blurry images. The large square one (Britannia NutriChoice) has weird elongated holes – it’s like cracker companies spare no thought at all for pinhole photographers. Anyhow, I went for the round cracker (Britannia Marie Gold) which has small, round holes.


Using my Cracker Cam
I built the camera in about one hour on a Saturday evening. I wanted to test it as soon as possible, so in the absence of daylight, I decided to use flash. Next question: how much exposure would I need? There are various ways to determine the effective aperture of a pinhole, which I’ve described in another article. But for the Cracker Cam, I just decided to use trial-and-error.
I set up the camera and my model, a Japanese doll, in a dimly-lit room (the behind-the-scenes photo was taken next morning, which is why it looks brighter). For illumination, I used a Rollei E15B flash, fired 8 times at close range.
I popped into my darkroom and developed the paper negative immediately (instant feedback, almost like using a digital camera!) The resulting image showed me that the camera was too high and too far, and also that I had underexposed. For my next attempt I repositioned the camera, and fired the flash 17 times. This produced an image I was satisfied with.
The photo of the Buddha figurine was taken the day after, in daylight. I used a 30-second exposure, with a dark cloth serving as a (partial) backdrop.


Final thoughts
If you are intrigued by the Cracker Cam, I would encourage you to try and make one (and to share your images with the #CamaraGalletitaChallenge hashtag). You can think of it as a community activity, a craft project or a science experiment, but it’s also artistically rewarding. Equally or perhaps more importantly, it’s a lot of fun.
The materials for a Cracker Cam can be found in almost any household (you can even bake the cracker yourself). For loading and developing, it’s probably easiest if you have access to a darkroom. But a very basic, makeshift darkroom will do – like a bathroom or closet. Nor do you need bulky, expensive equipment such as enlargers. You don’t even need trays; small paper negatives like mine can be developed in a jug.
Without a darkroom, a Cracker Cam might prove challenging, but you can still try other forms of pinhole photography, both film and digital. If you’re not sure where to start or have questions, just leave a comment and I’ll try my best to answer. Pinhole photography has given me endless enjoyment, so I love to see more people getting into it.
Evidently, pinhole cameras are not designed for sharp, technically perfect images; a Cracker Cam even less so. But as Henry Carroll says in one of his books, there are ‘human qualities that are hard to express through photography if everything is correct.’ The problem, he says, is that ‘cameras are perfectionists.’
For some photographers, such perfection is worth aspiring to. I myself have written reviews of superlative lenses and high-definition films. But not everything is about perfection. Sometimes, on an idle weekend, you want to sit down with some cardboard, scissors and tape. You want to make your own camera – imperfect, inconvenient, yet somehow still functional. At its heart, photography is simple; photography is fun. Sometimes, you want a Cracker Cam.
Want your own Cracker Camera? Go to the Grocery Store
Want a boring regular camera? Find one at F Stop Cameras
Follow Casual Photophile on Twitter, Facebook and Instagram
[Some of the links in this article will direct users to our affiliates at B&H Photo, Amazon, and eBay. By purchasing anything using these links, Casual Photophile may receive a small commission at no additional charge to you. This helps Casual Photophile produce the content we produce. Many thanks for your support.]


“it’s like cracker companies spare no thought at all for pinhole photographers”
That line alone was worth the price of admission! :-))
Thanks for the entertaining piece. Off to the kitchen now to check out some colanders, cheese graters, and other such devices.