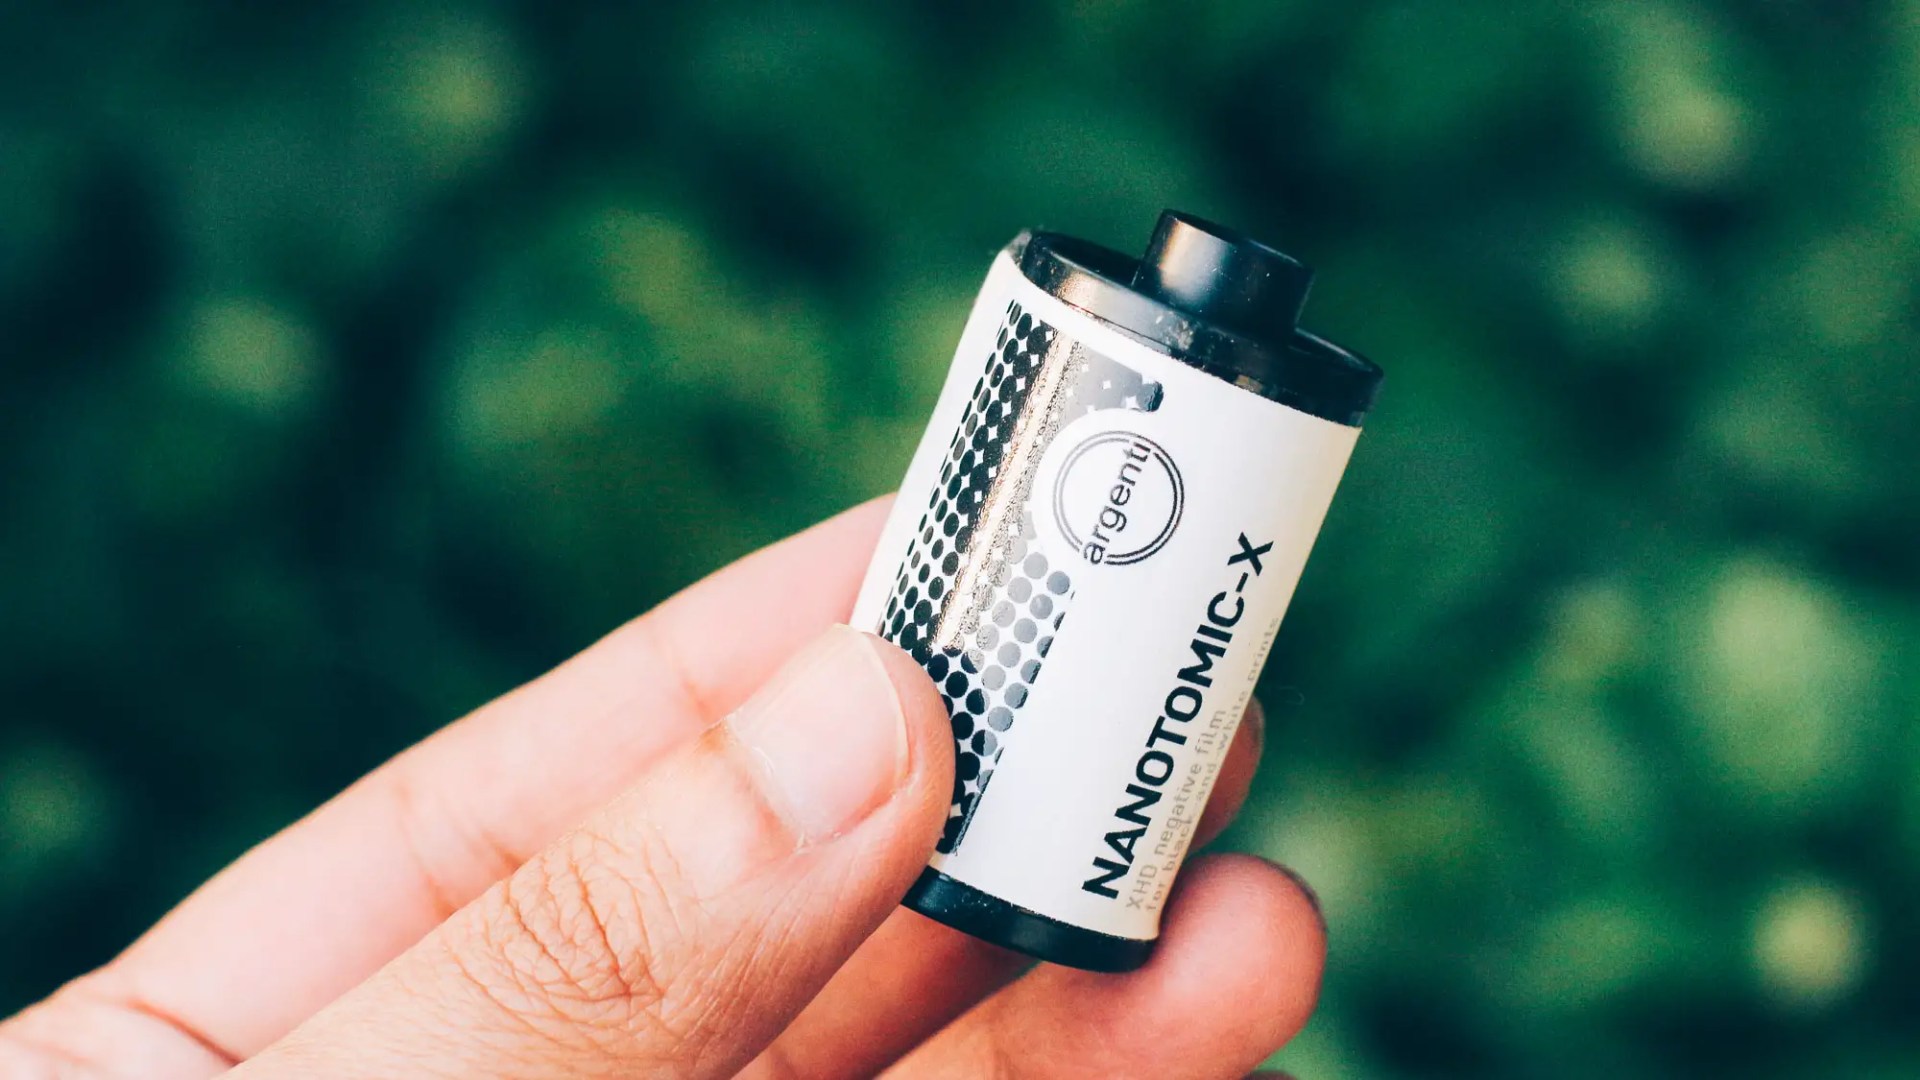
Argenti Nanotomic-X is a panchromatic black-and-white film with a nominal ISO of 32. But its slow speed is not the only unusual thing about this film (even slower films are available, like this ISO 6 film which I reviewed last year). Nanotomic-X is a ‘document film’, also known as microfilm, high-contrast copy film or technical film. These films have an intriguing history – later on in this article you’ll read about pigeon post during the siege of Paris, KGB spy cameras, and a developer formulated to record nuclear explosions on film.
Document films also have some fascinating characteristics. Troop and Anchell, in The Film Developing Cookbook, say they produce ‘the finest grain and highest sharpness the photographic process is capable of.’
At this point you’re probably thinking, ‘There’s gotta be a catch.’ And you would be right (in fact, there are several). So, are document films like Nanotomic-X best left to their original purpose: making microscopic copies of physical documents? Or can they also be used for ordinary ‘pictorial’ photography?
Two quick disclaimers before we start.
First, I didn’t pay for my roll of Nanotomic-X. Foto R3, a Spanish film shop/lab, kindly sent it to me as a test roll (along with some other films which I did pay for). But of course, in my review I have tried to be as accurate and objective as I can.
Second, Nanotomic-X and other document films are meant to be used with specialised developers (more on this later). I developed my roll in plain old Ilford ID-11 1+1. The downside is that I’m possibly not using the film to its utmost potential. The upside is that you can see how it performs with a cheap and widely-available developer, and decide if it’s something you’d like to try for yourself.


[Image Sources: Microfilm camera: The US National Archives, public domain. Microfilm roll: Wikimedia Commons, CC BY-SA 4.0. Microfilm reader: Wikimedia Commons, CC BY-SA 2.0.]
A Brief History of Microfilm
Microfilm is a type of fine-grain, high-contrast film, primarily designed for copying documents, drawings and other such matter. Copies are typically made at a greatly reduced scale for compact storage and distribution.
The technology is surprisingly old. John Benjamin Dancer, a British scientist, began producing microphotographs in 1839 – first as daguerreotypes and then with wet collodion. But it took a while to catch on. In 1858, the Dictionary of Photography dismissed it as ‘a process which must strike any reasonable person as somewhat trifling and childish, when he considers how many valuable applications of photography remain yet to be worked out.’
Americans were more optimistic. ‘To what use might not this mode of photographing be put,’ enthused an article in the 1859 American Journal of Photography. ‘The whole archives of a nation might be packed away in a snuff-box. Had the art been known in the time of Omar, the destruction of the Alexandrian library would not have been a final loss.’
During the siege of Paris in 1870–71, the Prussian army cut the telegraph cables, and postmen were captured and shot. The only way the rest of France could communicate with Paris was by carrier pigeon. The despatch would be photographed on microfilm, a whole page reduced to just 11×6 mm. This was inserted in the quill of a goose or crow, which in turn was attached to the pigeon’s tail feather. In this way, a single pigeon was able to carry up to 20 microfilms at a time.
More prosaic uses of microfilm include the copying of books, manuscripts and newspapers for preservation, much like how digitisation is used today. Indeed, with the rise of digital technology, microfilm seems almost amusingly retro (YouTube has a compilation of ‘hot chicks looking at microfilm in horror movies’). But properly stored microfilm lasts half a millennium, and can be read without complex hardware or software. This is why institutions like the Smithsonian are still using the technology well into the 21st century.


Nanotomic-X: Origin and Availability
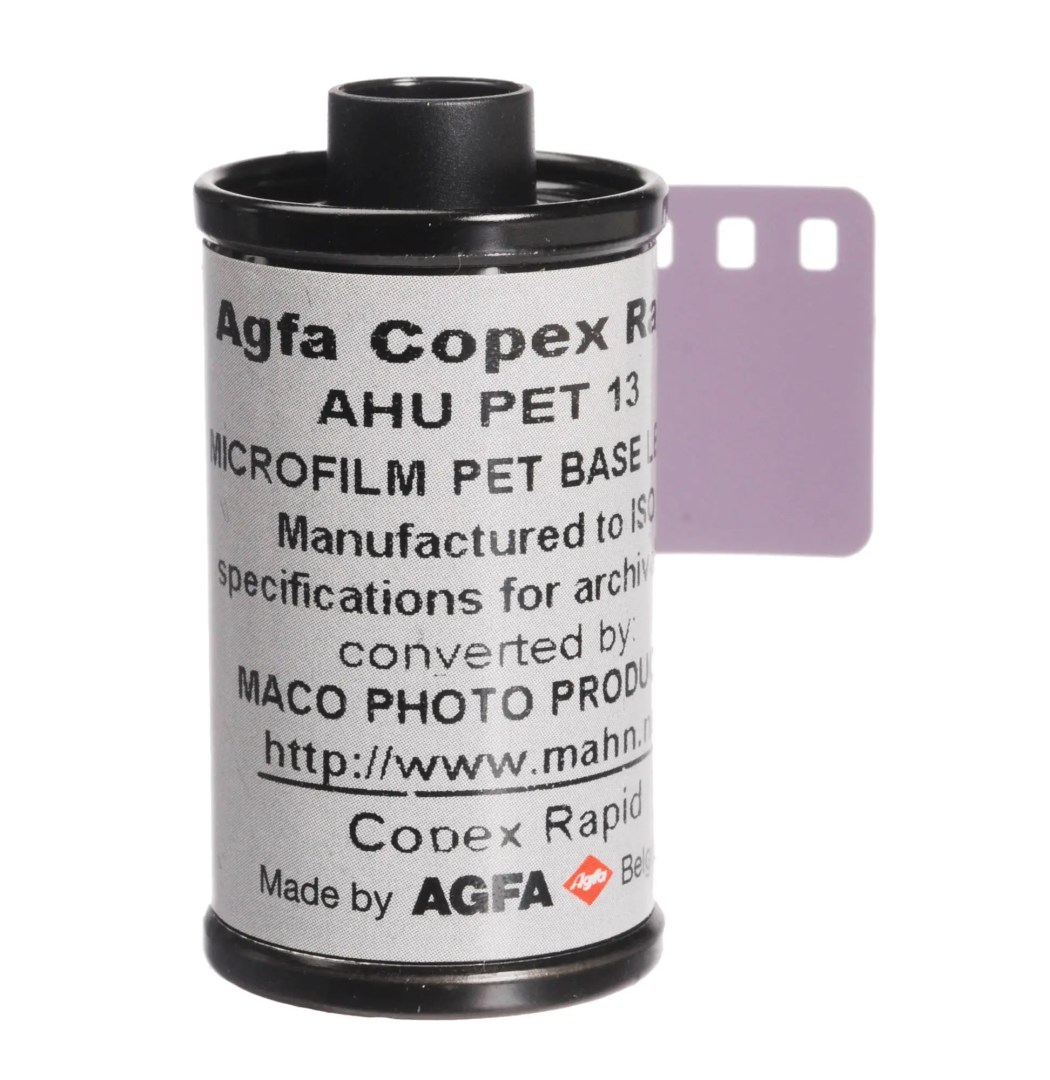
16mm microfilm is generally used for documents and other printed matter, and 35mm unperforated film for engineering drawings. But 35mm perforated document film also exists, including Argenti Nanotomic-X, the subject of this review. I understand from Foto-R3, who sent me the test roll, that Nanotomic-X is basically Agfa Copex Rapid sold under the Argenti brand name. (Historically, there were other variants such as Copex Ortho and Copex HDP13, but in this article, when I say ‘Copex’ I mean Copex Rapid.)
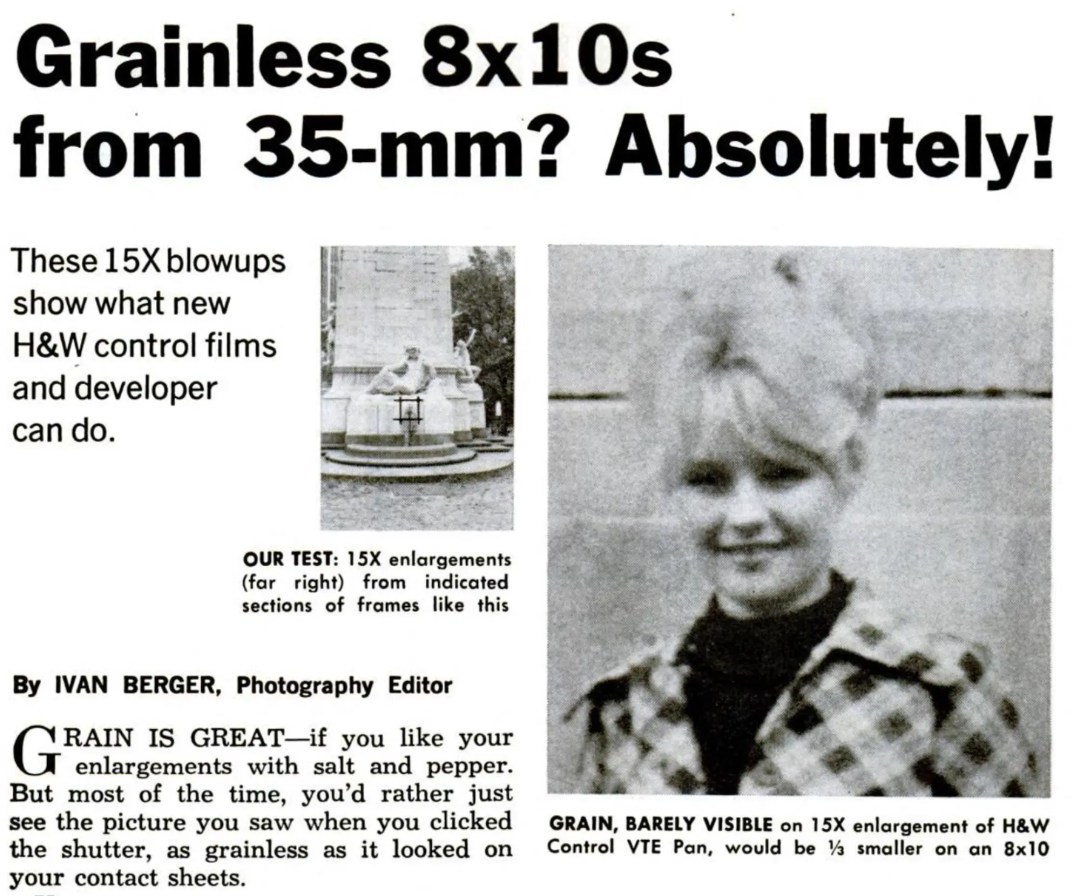
I am not actually sure when Agfa Copex was first produced, or in what format. A Google Books search returns hits from 1945 (possibly even earlier), but Agfa’s 1941 catalogue has no mention of Copex film. At least one forum post claims that Copex was even used by the KGB. Troop and Anchell say that Copex was one of the ‘document films of choice for making continuous tone pictures’ in the 1960s, and that it continued to be manufactured until about 2019. It has also been sold under other brand names. A Popular Mechanics article from Jan 1973, part of which is reproduced below, says that H&W Control VTE Pan is rebranded Agfa Copex.
Today, Copex is sold with the Agfa brand name, in both 35mm and 120 format, by a few retailers in Europe and North America. It is also sold under other names such as Rollei Copex Rapid, Spur DSX, and of course, Argenti Nanotomic-X (35mm only).
Nanotomic-X in Special Developers
Films with bigger grain, as everyone knows, are generally faster. This is simply because larger grains are more likely to ‘catch’ a photon of light, in the same way that you’re more likely to catch a raindrop with a bucket than with a thimble. Conversely, slow films have smaller grain.
Document films have grain which is not just smaller, but also more uniform in size (‘monodisperse’, to use a technical term). In his report on Nanotomic-X (PDF in Spanish), Xosé Gago says that the largest grains in a document film are only around 10–20x the size of the smallest grains (compared to 75–200x for normal 25–125 ISO films).
If you’re using document film for pictorial (as opposed to copy) purposes, the highly monodisperse grain poses a problem in development. Here’s why. Imagine you have a spoonful of sugar crystals of varying size – some small, some not-so-small. If you dissolve it in water, the smaller crystals go into solution quickly; the bigger ones take more time.
But if you have a spoonful of small, homogeneous sugar crystals, they dissolve a lot more quickly. This is what happens when you try to develop document film. The silver halide crystals which have reacted to light are very quickly reduced by the developer, causing a rapid density rise in highlight areas (in a regular film, the more heterogeneous grain structure would slow down the development of highlight areas, allowing the midtones to ‘catch up’). For this reason, document films have inherently higher contrast than regular films of similar speed.
The high contrast is perfect for copying things like text and line drawings – the purpose for which document films were originally devised. But for pictorial use – unless you want the high-contrast look – a document film like Nanotomic-X (Agfa Copex) is not ideal.
Erwin Puts writes it off altogether: ‘The Copex Rapid micro film from Agfa-Gevaert is just not suitable for pictorial use.’ Never say never, Mr. Puts. One solution, it turns out, is to use special developers. Here’s Troop and Anchell again: ‘In the 1960s it was discovered that these monodisperse films could be used for continuous tone pictorial photography when developed in special low contrast developers.’
Special, in this case, means really special. One of the developers they recommend is POTA, formulated in 1967 by US chemist Marilyn Levy. Apparently, POTA was originally designed to record nuclear explosions on conventional films, and is capable of recording light over a 20-stop range. (Another site says POTA was developed for aerial reconnaissance photography, but I like Troop and Anchell’s nuclear explosion backstory.) POTA can be homebrewed, or purchased from places like Photographers’ Formulary.
Troop and Anchell suggest various other alternatives, but it’s also worth mentioning Spur Dokuspeed SL-N and Spur Modular UR, which are supposedly optimised for Agfa Copex (Nanotomic-X).


[Portrait of Marilyn Levy: Wikimedia Commons, public domain.]
Nanotomic-X in a Regular Developer
Now I don’t mix developers at home, and nor did I want to spend money on a special developer, like the Spur formulas, for a film which I might never use again. So I decided to use what I always use, namely the incredibly versatile Ilford ID-11 diluted 1+1 (sometimes I use Kodak’s D-76, but they are basically identical).
Was this wise? My sources did not think so. Steve Anchell, in The Darkroom Cookbook, writes that unless they are developed in ‘extreme low contrast developers’, document films are ‘extremely high in contrast exhibiting little or no mid-tones.’ Likewise, in his article on high resolution photography (PDF), Heribert Schain says document films ‘are not suitable for pictorial photography if normal developers are used’ because they ‘cannot render differentiated grey scale values’ – only black and white. Instead, Schain recommends the Spur developers which, as a photo engineer at Spur, he was instrumental in formulating.
The development charts on the Foto-R3 website (PDF) and Digital Truth were more promising, listing times for ID-11 stock (5 mins when the film is rated at EI 25). Now I had rated it at EI 32, as recommended on the packaging. Moreover, I wanted to use ID-11 1+1 (rather than stock) because that’s what I always use, and I because thought – whether rightly or wrongly I don’t know – that the dilution might help tame the contrast. With some back-of-the-envelope calculations (too tedious to recount here, but if you’re interested, let me know in the comments), I estimated 5.5 mins in ID-11 1+1 for EI 32.
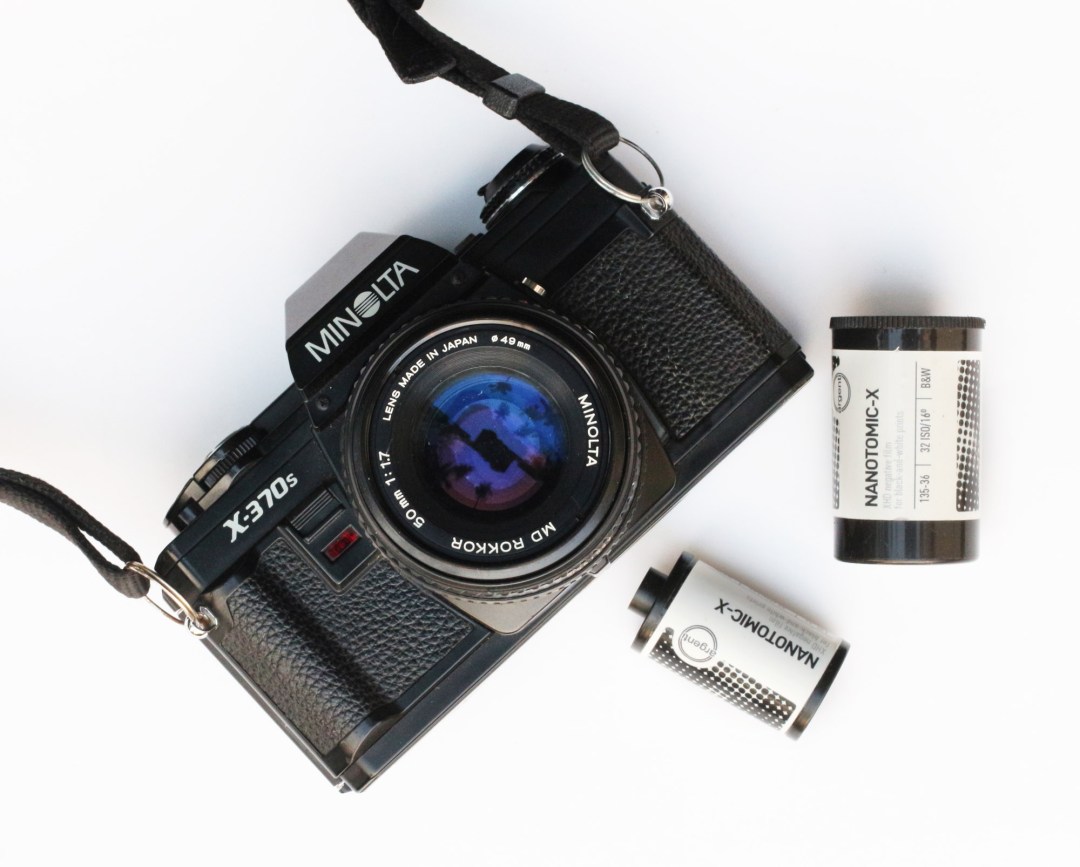
Thankfully, contrary to the warnings, I did not get ‘only black and white’ with no midtones. The negatives look nice, as you can see below. The top-left frame was deliberately overexposed for the latitude test described in the next section. For the other frames, I simply relied on the TTL meter of my Minolta X-370s, set to ISO 32 and aperture priority.

Contrast and Latitude
Whatever I say in this section only applies to the development regime which I used. With other developers or times, you might – probably will – get different results. In particular, special developers like Spur will probably produce a more conventional contrast curve.
I shot all or most of the roll in low to medium-contrast situations (it was winter, and that’s just how the light was). Under these conditions, I got decent shadow and highlight detail. Midtones are a bit compressed, but nothing too extreme.
If you shoot Nanotomic-X in high-contrast conditions, you might lose a bit of shadow detail, but highlights should be fine. If in doubt, overexpose by one stop – or better still, bracket.
I say ‘highlights should be fine’ because the film clearly has some latitude for overexposure, as you can see in the tests below. The six comparison shots were scanned at the same settings. I then edited the two extreme frames (−2 and +3 stops) to try and salvage what I could.


The +3 in particular is surprisingly usable. On that evidence, you could expose the film at, say, EI 25 or even EI 16, and develop it as I did. This would give you more shadow detail, and the highlights would probably still be recoverable in post (or in the darkroom, with burning).
As with most negative films, there is less latitude for underexposure. You can see this in the first two photos below (again, scanned at the same settings). For both photos, I relied on the camera’s TTL meter. Since there’s more sky in Photo 2, the camera underexposed by one stop (ideally I should have used AE lock feature or exposure compensation). With some films, you can get away with a bit of underexposure, but not so much with Nanotomic-X. The third photo is just an edited version of Photo 2; I brought out some shadow detail, but it still doesn’t have the tonal range of Photo 1.


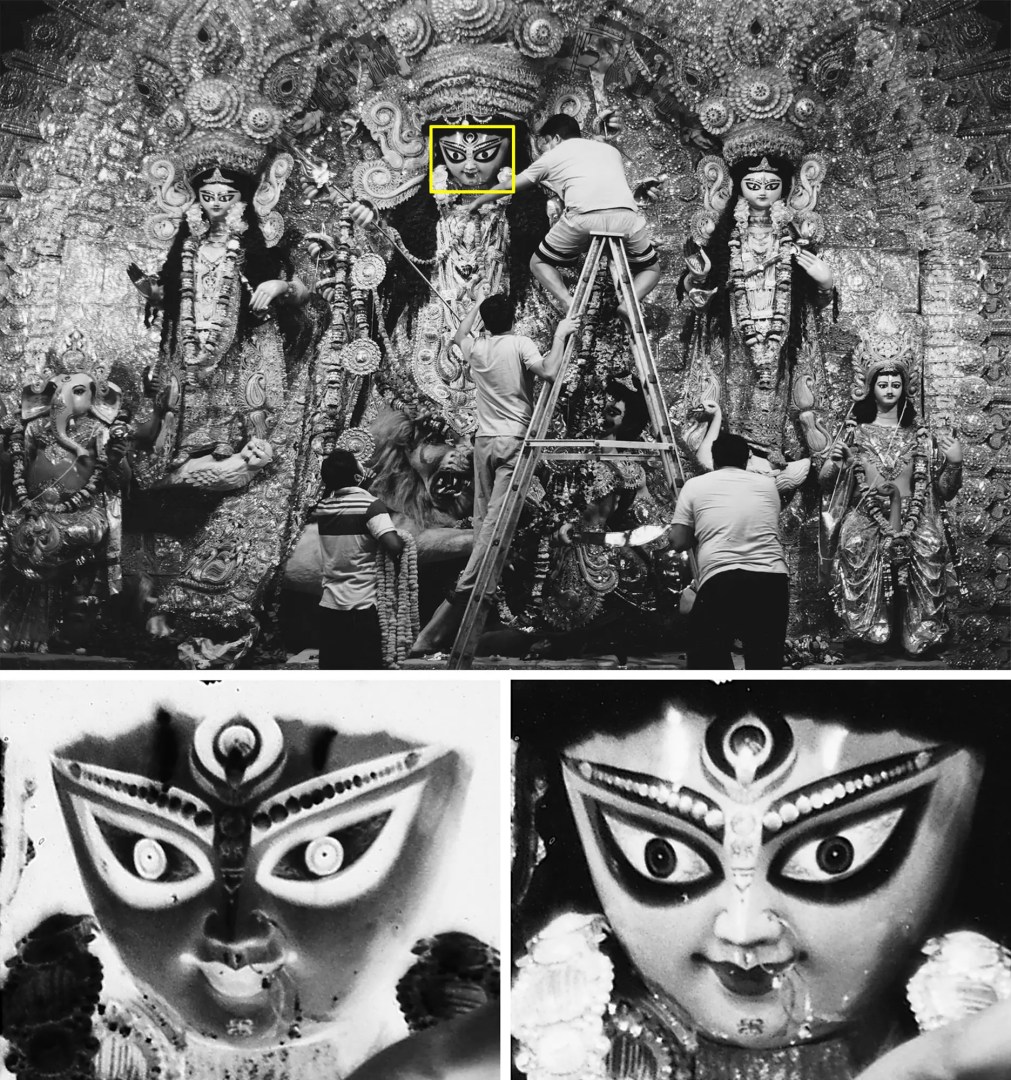
I noticed that the highlights on this film (at least, as I developed it) sometimes have a sort of ‘creamy’ look. I can’t think of a more accurate way to describe it, but maybe you can see what I mean from some of the photos – especially on noses and cheeks where bright reflections transition to darker areas of the face. I quite like the look; it’s not something I’ve seen on other films. But if you don’t, it might be something to watch out for.
It’s also possible that the creamy highlights were caused (or exacerbated) by overfixing. I fixed the film for 3 mins in Ilford Rapid Fixer like I usually do (Ilford recommends 2–5 mins). But I later read that document films should be fixed for a bare minimum time (please see the ‘precautions’ section near the end).
Prints
I made darkroom prints of two of my photos from this roll. The fern printed nicely at Grade 2 with minimal fuss. The photo of the two kids has rather thin shadows. I printed it at Grade 0 to tease out the shadows, and then burned in some of the highlight detail. To my eyes, the smooth tones and ultra-fine grain give the prints an almost medium-format look.
I’ve shot just one roll of Nanotomic-X so far, but for more photo samples, you can explore Instagram, as well as Flickr tags for Nanotomic-X and Copex. For more reviews, see Kowska (Spanish), SFLab and Random Camera Blog.


ISO and Reciprocity Failure
ISO 32 might seem too slow for general use, but I shot the entire roll in available light and – aside from the reciprocity tests below – without a tripod. In bright light, the sunny 16 rule with an ISO 32 film gives you f/16 and 1/30, which is already usable if you have steady hands or a wide-angle lens. If you want faster speeds, just open up a few stops.
Slow film is useful for creative applications which require slow shutter speeds, like panning and motion blur. It also lets you take shallow depth-of-field portraits in bright light, whereas with faster film, you’d have to use an ND filter or stop down.
The Agfa Copex datasheet (PDF) does not have reciprocity data. According to my tests, the reciprocity formula for Ilford FP4 appears to work well for Nanotomic-X. The formula is m^1.26 (where m is the metered time). For example, if your metered time is 10 secs, the reciprocity-adjusted time will be 10^1.26=18 secs.
The three photos below show (a) a fast exposure (1/60 sec) where reciprocity was not in play, (b) an exposure at the same aperture but with a 10-stop ND filter, using a 10 stops slower shutter speed (17 secs), and (c) an exposure at the same aperture, 10-stop ND filter and reciprocity adjustment (17^1.26=36 secs). I scanned all three images at the same settings.


The two long exposures have slight camera-shake, because I forgot to bring my shutter-release cable and was manually pressing the shutter-release for the whole duration. But overall, you can see that (a) and (c) have similar exposures, while (b) is underexposed.
Film Base and Grain
Nanotomic-X has a clear polyester base. Most 35mm films for still photography, like Kodak Tri-X and Ilford HP5, have a triacetate base. Polyester film is stronger, stabler and more durable. But its strength can pose a practical problem: if the film-advance mechanism jams and you force it, triacetate film will break, while polyester film can damage the camera itself.
The clear base looks nice on a light table, and makes the film easy to scan. The flip side is that dust particles, water marks and scratches are more visible. If you don’t like such imperfections in your photos, practice good film hygiene (mine is not the best) or resign yourself to a lot of spotting.
The film has an anti-halation layer to prevent internal reflections. The base is 0.130mm thick (similar to Ilford FP4 Plus: 0.125mm). I had no trouble loading it in my development tank. The processed negatives have no more than the usual amount of curl. Nanotomic-X has frame numbers – rather faint, but helpful for sleeving and archiving – but no other edge markings.
Even for a slow film, the grain is extremely fine. When making 8×10″ darkroom prints, even with a grain focuser, I struggled to see grain. In scans, the grain is essentially invisible. By magnifying a ridiculously small area (the yellow rectangle in the photo below), I think I can see a hint of grain. But at this level of enlargement, I am frankly not sure if it’s film grain, or noise from my DSLR ‘scan’. To put things in perspective, that area is less than 3mm wide on the negative.
Resolution
This is the big one – the reason why many photographers are drawn to document film in the first place, and why they put up with its various idiosyncrasies. As it happens, I personally can’t get too excited about resolution, whether for film or for lenses (my last article was about a toy camera with a plastic lens). Maybe I’m the wrong person to review a document film? Anyway, here we are, so I’ll try my best to talk about resolution, for the benefit of those who are interested.
I made a table comparing the resolution of Copex Rapid/Nanotomic-X versus Kodak T-Max 100, which is marketed as having ‘extremely high sharpness, extremely fine grain, and very high resolving power’ (quote from Kodak’s PDF datasheet). The figures are compiled from various sources, which I’ve indicated below.
| Contrast | Copex Rapid/Nanotomic-X | T-Max 100 |
| 1000:1 | 600 lp/mm* | 200 lp/mm*** |
| 4:1 | 165–200 lp/mm** | 135–150 lp/mm** |
| 1.6:1 | Unknown | 63 lp/mm*** |
* Schain (PDF), using Spur developer.
** Serger, using fine-grain, high-resolution developers like Spur developer (for Copex Rapid) and Microdol X (for T-Max 100).
*** Kodak datasheet (PDF), developed in D-76.
Resolution was traditionally measured in lp/mm, i.e. line pairs per millimetre (the terms ‘lines per millimetre’ and ‘line pairs per millimetre’ are interchangeable). More recently, the industry has shifted to using modulation transfer function (MTF), but I haven’t been able to find MTF charts for Agfa Copex. Norman Koren, the founder of Imatest, has a great technical article on MTF, and how it relates to lp/mm and sharpness.
Lp/mm can be measured at different contrast levels. As you would expect, when lines have high contrast (e.g. 1000:1), they are easier to resolve, and consequently lp/mm figures are higher. Copex appears to outresolve T-Max 100 at both high and medium contrast levels (and probably at low contrast too, though I wasn’t able to find data).
Does the higher resolution make a practical difference? I’ll say a bit more about it in the ‘Final thoughts’ section at the end, but frankly, I don’t know. What does seem certain is that, at least for some specialised applications, there is no real substitute for document films. Troop and Anchell say ‘these are the films to use for 40x enlargements.’ For context, a 40x enlargement from a 35mm negative is a 140×96 cm print – nearly 5 feet on the long edge! This is not something I’ve ever attempted, nor do I plan to. But I think it’s cool.
But to get there, you need a correspondingly exacting workflow. Film flatness, eliminating camera shake, high-quality lenses (for both camera and enlarger) used at optimal aperture, special developers, perfect enlarger alignment and sundry other precautions are recommended, if not essential, to get the most out of these high-resolution films.
Colour Sensitivity
Most modern black-and-white films are panchromatic, which means they are sensitive to more or less the whole range of the visible spectrum. Datasheets released by film manufacturers often include spectral sensitivity curves, showing how the emulsion responds to different wavelengths of light. I couldn’t find such a chart for Nanotomic-X/Copex, but there’s a basic test I do to check this for myself.
I won’t go into the details (topic for a future article), but in short, I take a test-shot of a colour chart (see below), in controlled conditions, for the film I’m testing. I then compare it to the same test-shot on HP5, which is a classic panchromatic emulsion and therefore a good benchmark.

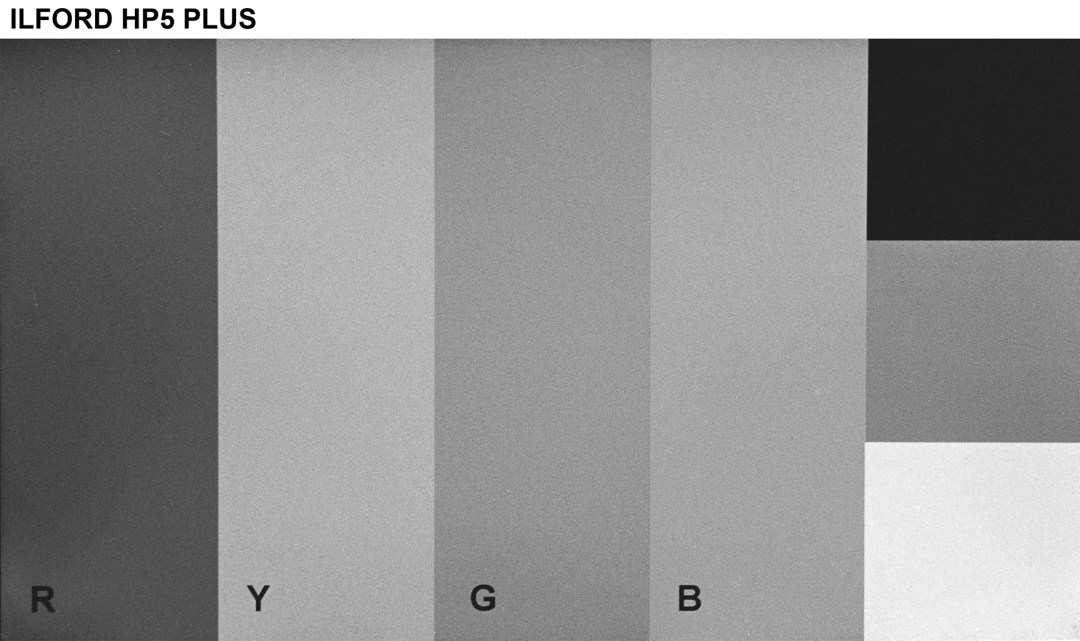

What I’m looking at is the order of the coloured bands from light to dark, as they appear on film. I’m less concerned with the fact that, say, Red looks a bit darker than Yellow on one film, and a lot darker on another. These are differences in band contrast, which could be influenced by how I develop and scan the film. But developing and scanning won’t affect the band order, so that’s what I focus on.
The main difference here is that Blue is slightly lighter than Green on HP5, but significantly darker than green on Nanotomic-X. This suggests that Nanotomic-X is less sensitive to blue light. Interestingly, the Naked Photographer also found lower blue sensitivity in his test of Agfa Copex.
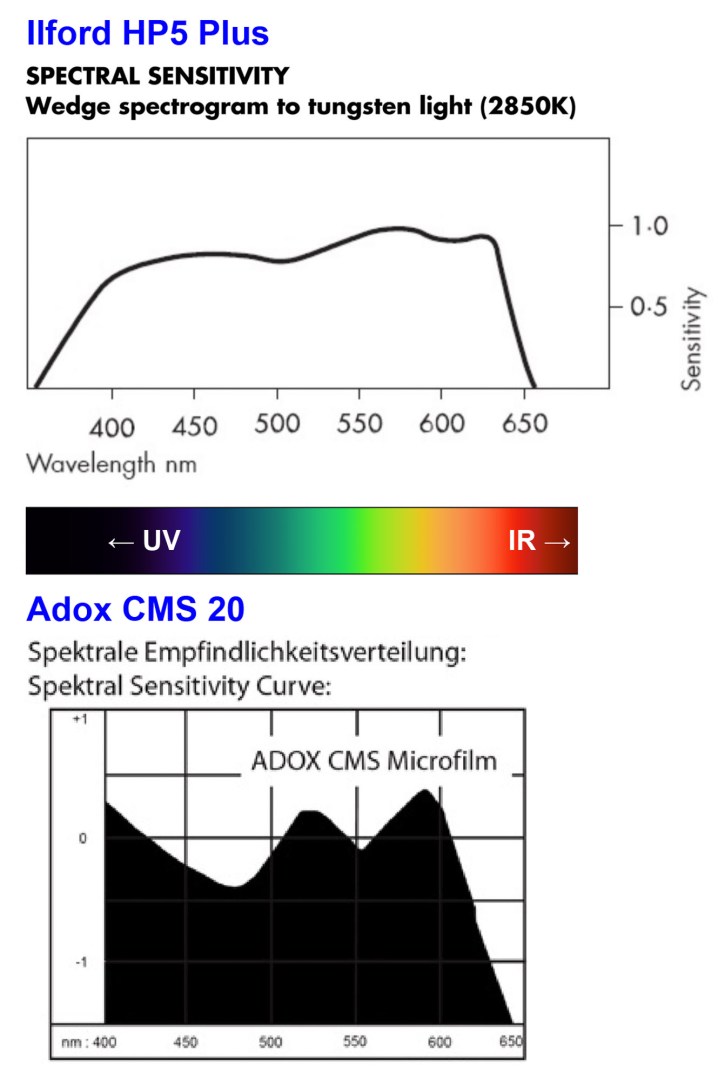
I looked for further confirmation in the form of spectral sensitivity curves, but as I said, I couldn’t find one for Nanotomic-X/Copex. I did however find one for Adox CMS 20 (PDF) – another document film which is advertised as having even higher resolution. I’ve shown a comparison between the HP5 and Adox curves above. As you can see, HP5 is more plateau-shaped, whereas the Adox has a ‘valley’ in the blue-cyan region. If Nanotomic-X is similar to the Adox, we can see how it would be less sensitive to blue.
All this might seem quite technical, but it does have an impact on photos. For example, I would expect a blue sky with clouds to look more contrasty on Nanotomic-X than on HP5, which is quite sensitive to blue and therefore renders it as a fairly light shade. Unfortunately I didn’t take any blue-sky photos on this roll, but it would be interesting to try.
Film reviews tend to focus on grain and contrast, but these factors are heavily dependent on how a film is exposed and developed. Colour response, on the other hand, is rarely discussed. Nevertheless, it is an intrinsic feature of black-and-white film. Each emulsion has a distinct spectral sensitivity profile, which subtly defines its ‘look’.
Precautions
Films with a clear base can be susceptible to light piping. The Agfa Copex datasheet (PDF) reassures us that the anti-halation layer ‘facilitates daylight loading’. On the other hand, some retailers warn that the film ‘has to be loaded and unloaded in subdued light’ and that exposed film should be stored in a light-tight container. I think it’s safer to follow this recommendation, just in case.
When it comes to processing, Troop and Anchell warn that ‘overfixing must particularly be avoided with document films’. They recommend moving to a water rinse with agitation immediately after fixing, or better yet, using an alkaline fixer. The datasheet for Adox CMS 20 (PDF), another high-resolution document film, has a similar warning: ‘Because of the small, fine grains Adox CMS 20 needs only 30 to 60 seconds of fixing in regularily diluted fixers at 20°C. If you overfix the film your highlights (in the negative) will burn out.’ Presumably, this applies to Nanotomic-X too. If in doubt, just drop the cut film leader in a jug of fixer, see how long it takes to clear, and use double that time for fixing the film.


Final Thoughts
You know how some digital photographers love to argue about the relative merits of sensors? CCD versus CMOS, X-Trans versus Bayer, Sony reds versus Fuji greens. For me, one of the joys of film photography is having an instantly interchangeable ‘sensor’. Each emulsion has its own individual characteristics, limitations and advantages.
With document film, the obvious advantages are fine grain and incredible resolving power. The grain is indeed fine, almost invisible. The resolving power, too, is much higher than conventional films. When scientists wanted to study microscopic tapeworm organs or bird chromosomes, they used Agfa Copex. But does such extraordinary resolution make a practical difference to ordinary photographers like me?
Some – not just people like Schain who are involved in the marketing of document films and developers, but also independent authorities like Troop and Anchell – seem to think it does. Others, such as Erwin Puts, assert otherwise. Who is right? I have no idea. I honestly don’t want to go down the rabbit-hole of trying to read, understand and evaluate the various conflicting arguments, and I have little interest in doing my own tests.
I enjoy films like Argenti Nanotomic-X in the same spirit in which I enjoy some high-end lenses. Even if I don’t use them to their full potential – which I almost certainly don’t – I can appreciate them purely for the technical marvel that they are.
I also like trying unusual films, and Nanotomic-X checks that box. It certainly helps that it’s just €4.79 for a 36-exposure roll, a real bargain for such a specialist film.
And finally, I like its tonal characteristics and unique look. Let me quote Troop and Anchell one last time: ‘What we find most exciting about working with document films is not the ability to make huge enlargements. (…) For us, what makes working with document films so rewarding is their ability to produce unusual tonalities through unusual characteristic curve shapes. They add to our palette.’ Amen to that.
Buy film from B&H Photo here
See all of our film profiles here
Get Inspired
For more stories behind the images and photography from the community check out the many series we’ve published over the years below!
Featured Photophile – we shine a spotlight on amateur photographers whose work we love.
Photographer Interviews – in-depth discussions with professional and established photogs doing great work.
Female Photographers to Follow – get inspired by a monthly series focused on the beautiful and unique perspectives of female photographers.
Five Favorite Photos – a hand-selected examination of the oeuvre of ur favorite famous photographers.

CASUAL PHOTOPHILE is on Twitter, Facebook, Instagram, and Youtube
[Some of the links in this article will direct users to our affiliates at B&H Photo, Amazon, and eBay. By purchasing anything using these links, Casual Photophile may receive a small commission at no additional charge to you. This helps Casual Photophile produce the content we produce. Many thanks for your support.]
Patience is the most valuable quality. Because when we finally get what we were waiting for : pleasure is extreme.
How many months Sroyon since your last great review?
This one is simply magic.
This one si simply perfect.
100 % good.
Great film
Great informations
Great images
100 % USEFUL.
I want to try this film.
This film will be certainly perfect with my Leica M3.
GRATITUDE Sroyon.
One more time you source us.